Showing posts with label projects. Show all posts

Thursday, May 14, 2009

How to Make a Magic Carpet

The study of Persian rugs is an interesting way to get into Persian history and Islamic culture. Why are Persian carpets so beautiful? In a culture where iconography is immoral, a functional object like a rug is a place where art can be expressed "legally." Like calligraphy, Persian carpets are art in the guise of a necessity. Given the significance of these rugs to the culture from which they come, it's no wonder they are sometimes portrayed as magical.

Here are a few things we learned about while studying Persian rugs: symmetry, the types of designs (geometric, curvilinear, pictorial), the elements of a rug (border, central medallion, repeated motifs), child labor laws, how to value a rug based on knot count, the difference between natural fibers and manmade fibers, and more.

Project materials:

Large canvas rectangles
Crop-a-dile or other awesome hole-puncher
Lace-weight yarn/thread in different colors
Poster paint and brushes

Preparation:

Punch holes in the short sides of all the carpets, about 1/2 inch apart. You are going to need a serious, no-kidding hole punch to get through canvas. I used a Crop-a-dile.
Cut the thread into pieces about 10 inches long. Deep rich colors are best.

Step One: Fringe


Give each child a choice of thread colors and encourage them to work in patterns. They can use a simple knot to create their fringe. Make a loop in the center of the thread, push the loop through the hole, and then thread both ends through the loop. Pull tight. You can fold over the edge of the fabric as you go to create a smooth edge.


Step Two: Paint

First have the children sketch their ideas with a pencil lightly so they can erase and redo it if they're not happy with it. Make sure everyone remembers to put in a border, a central medallion, and then repeated motifs.


The kids took home some interesting work! Painting on the canvas was challenging for a few, they needed reminding to keep a lot of paint on their brushes. However, making the carpets led to some interesting discussions about what the carpets mean to the people who make them. Here is the class singing a Persian folk song while they worked. They started singing spontaneously, then of course I had to run get my camera and have them do it again!


What class is this? My elementary literature class at Norfolk's premier co-op of extreme homeschool awesomeness, Homeschool Out of the Box.

Saturday, December 13, 2008

How to Make a Sweater from Scratch

First, purchase six skeins of a yarn that's cursed with the insidious, unbearable, name "Softee." Purchase it because it is $2/skein at Michael's. Think, "I will make a prayer shawl out of this." Any chunky yarn will actually do. It doesn't have to have a title that makes you want to hack off your head with a rusty saw.


Cast on 62 stitches on size 9 needles. Begin knitting a ribbed pattern, knit 2 purl 2 etc, for ten rows.

Begin faux cabling, using a very fancy sneaky non-cabley cable recipe that you learned by creepily staring at Colyn while she was knitting. If you don't know Colyn, you can spookily leer at any knitter who's doing a stitch you admire. If they look at you suspiciously, compliment their glasses. That always works.

Cable for a while.

You should at some point in the first 30 rows gasp and realize that due to the scrunched-upness of the cabling and ribbing, this prayer shawl will be only wide enough to wrap up some kind of sad terrier.

Despair.

Decide that what it really was all along was the front of a sweater for your four-year-old daughter.

Rejoice!

After you've knit until the bottom of the sweater comes to your daughter's hips when the top of the sweater is at her armpits, cast off 5 on both sides and switch to your second color.

Continue until the top of the white is at your daughter's neck when the bottom is at her armpit, then cast off all but three repeats of the cabling thingy, and continue making a little asymmetrical tab thingy on *one side of the sweater only.*

Make a duplicate for the back. Now when you put these two things together, the little tab thingy will be on opposite sides, will form a shoulder, and you can stitch them together. See, this is the shape:


After you've got two of those thingies and you've put them together at the sides and shoulder, it's time to start panicking about the sleeves. Make a complicated plan. Confuse yourself. Live for days in inner turmoil.

This is a good time to hang out with some experienced and intelligent knitters. You might want to clutch at your head periodically and loudly say, "I DON'T KNOW WHAT I'M GOING TO DO ABOUT THESE SLEEVES! MY MY!" Hopefully someone will stop you from knitting and tearing out mysteriously shaped sleeve pieces which you intend to set in, and say, "Just pick up the stitches around the arm hole." In my case it was Deva.

Pick up the stitches around the armhole on size 6 double pointed needles. Celebrate! Rejoice! For me it was about 40 stitches. Continue knitting stockinette in the round until when you put the garment on your daughter she says it is almost the right length. Then switch to ribbing for 10 rows.

Do the other sleeve.

Put the sweater on your daughter. She will say that it needs something. Something like pink flowers.

Decide that pink flowers can be stapled onto the front of the sweater like an afterthought. Crochet some little flowers in a similar yarn. Sew them onto the front of the sweater with the flower color yarn -- I recommend sewing down all the petals.

Now pick up the stitches around the neck and knit some ribbing until your daughter proclaims "IT'S CHOKING ME!" Tear out a couple of rows, and cast off.

You're done!


Disclaimer: I am an idiot who has no idea how to make a sweater. I was helped along by extremely generous and smart knitters who saved me from making stupid mistakes. Your mileage may vary!

Monday, October 20, 2008

Patchwork Vest and Pants

This is the three inch strip project. Most of it was made with three inch strips.

My friend Kristen asked me months ago if I would make a vest and pants for her son Rhys to wear in a wedding. I said, "Of course!" because I love Kristen and adore Rhys and I especially like making great clothes for little boys. I used to make clothes for children, for my own and others, and also sold them occasionally. I don't sell them anymore but I do make skirts for Sadie and me and I make other things here and there, and have made things for Kristen and her kids before too. So, no big deal.

Except that... when it got down to it, I was very intimidated by the project. I had not made any "special occasion" garments in the past, nor had I sewed something on purpose that I knew was going to be scruitinized to this degree. Kristen sews, and her mom sews, in fact her mom really really sews, and knowing that these expert types would be looking at the seams (albeit in a dear, sweet, kind, approving way) kind of blocked me up. When the box of fabric arrived for me to use, I looked at it fondly and thought, "Somebody should certainly make a vest and pants out of that. I wonder if anyone will?"

On Friday I pulled out my patterns and started thinking, and made a couple of quilt blocks. On Saturday I made those quilt blocks into the outside of a vest. On Sunday I did the lining of the vest, the pants, the pants lining, and put it all together with some decorative stitching on top. Everything has pockets. Everything has a million colors. I hope the poor child survives this experience with his equilibrium. Not everyone could make this outfit work, but Rhys is definitely the child to manage it, if such a child exists.

Front of the vest:


Back of the vest:


Pants:


Everything on Sadie:


Sadie is at least a whole size too small for it, so that's why it looks like she's swimming in it. I just wanted to see it on an actual child. But I'm sure Kristen will take pictures! ;D

It's in the mail for Thursday. I did not sew up the opening on the elastic casing, in case adjustments need to be made. I made it to a 25 inch waist, but without a fitting I'm nervous about the size. If you need to make it smaller, and you have time, pull out the elastic until you find the seam, fold it smaller, resew it, chop off the excess, stitch up the opening. If you don't have any time, you can just pin it tighter with a safety pin, or tear out the seam and repin it looser with a safety pin, then just leave the opening open and no one will ever know. With the pants -- they're steamed with a double cuff at the hem to be 16 1/2 inch inseam. If you need them longer, refold, resteam, you could even tack it up or even ideally create a little dart with a button. I was nervous to tack it up or put a button there because I couldn't check the length on the actual child. If you have no time, just roll them up and go with it. :) The fabric with two layers is stiff enough to hold the cuff.

Whew! Done!

Edited to add:


Wednesday, August 20, 2008

How to Make a Duct Tape Hat

Want to learn to make an awesome, waterproof, colorful, duct tape hat, using two rolls of duct tape and nothing else!? Welcome! This project is part of the Vote for Me! Elections Unit Study hosted here at Little Blue School. All the lucky people who are attending the political conventions are going to be wearing those crazy, ridiculous, fashionable hats, so I decided to get us in the mood with duct tape hats. My dear friend Lori, adored playmate of my childhood, brought her kids over today to play. They are also homeschoolers! Naturally, I roped them into some hatmaking, particularly Eden, who is 11 and handy with the duct tape.
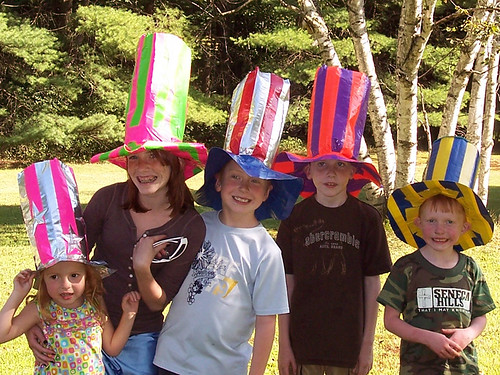
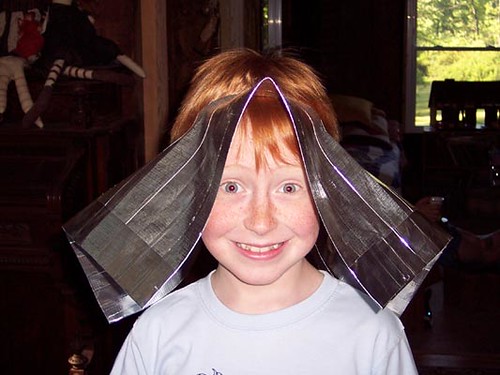
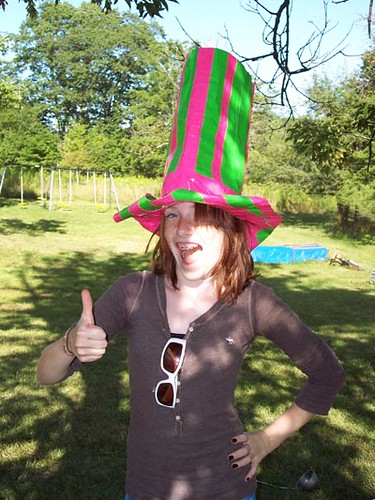
Here's our result:


So, how did we get there?

Materials:
Duct tape in many colors. We used Duck brand which comes in purple, orange, blue, red, chrome, pink, aqua, yellow, and other silly choices. I used approximately two rolls per hat. Some rolls have more on them than others. I had no problem getting a whole hat out of two small rolls, with leftovers.
Scissors you don't care too much about. They will get sticky.

I can think of a million variations to this hat, but here are directions for my hat, my method:

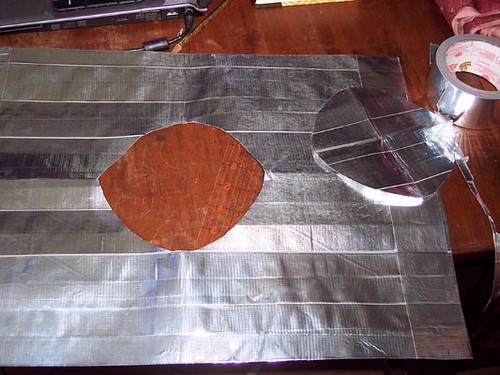
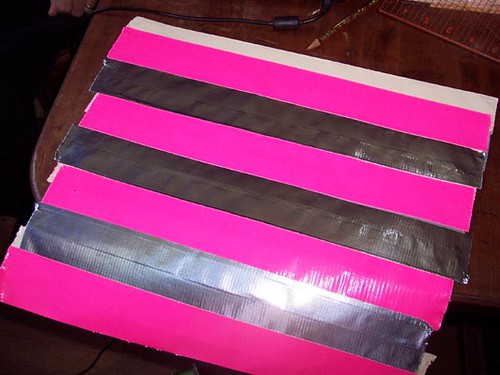
1. Build the Brim Square. First, you build a square from which to cut the brim.


Lay down a piece of tape, about 18 inches long, sticky side up.
Next tear off another piece of the same length. Lay it on the first piece, sticky side down, staggered halfway up.
Now you have two pieces of tape stuck together, with half the sticky side exposed on each side.
Turn the piece over to expose the sticky part of the tape you just added.
Stick another piece on, same length, sticky side down, over that one.
Continue until you have a square.

By laying each piece of tape exactly over the other, arranging these two-sided strips next to each other, and then laying another layer of tape perpendicular to the first layer, to join them, you can create a stronger piece. Like I said, there are other ways, but this was my way.

2. Cut the Head Hole. When you have built a square, cut a circle out from the middle of it.


You'll need a circle that will allow your head to go into it, but be careful of making it too loose. Duct tape is actually pretty stretchy. To get a circle, fold your square in half and then cut a quarter circle away from the center point, then unfold. If you start with a 3.25 inch quarter circle, you will probably be in the right neighborhood. Big math points to older students for figuring all this out exactly. Fit it onto your head to make sure it will go:


3. Create the Crown Rectangle. Now it's time to make the crown. Figure out how high you want your hat to be. I did about 12 inch strips. Your vertical strips will be joined together in exactly the same manner that you joined strips to build the brim. If you want stripes, alternate colors -- two blue (one in the front, turn, one in the back) then two red (one in the front, turn, one in the back)

Here's me making the striped crown of Sadie's pink-and-chrome hat:


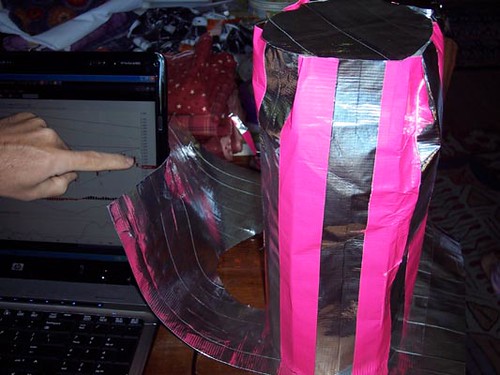
4. Join the Crown Tube. When the crown has been built up to a length that will wrap around your head and fit approximately into the hole you made in your brim, finish it by joining the two ends together.

Here I am with the "stovepipe" part of the hat, measuring it against the hole in the brim, while Dan explains something about trading to me:


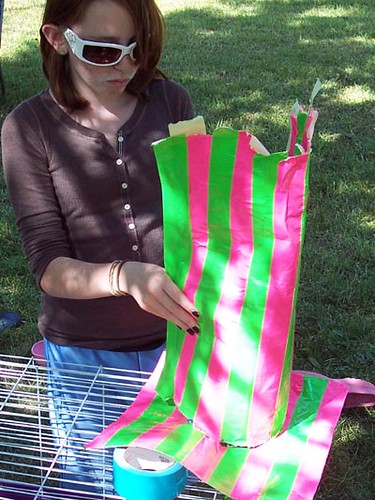
Here's Eden measuring her crown against her brim, checking to see if she needs to add more strips:
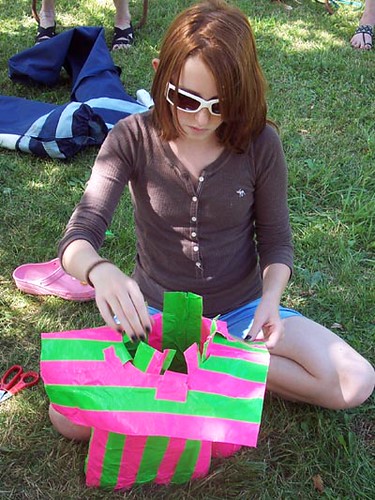
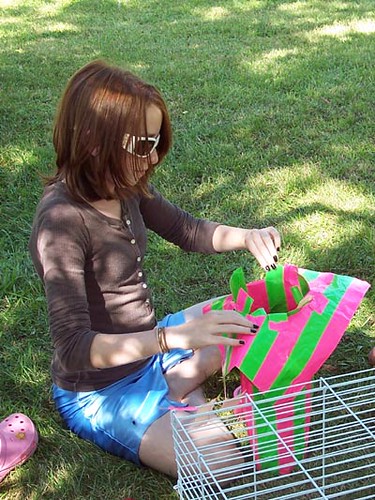


5. Cut the Tabs. Now cut slits in the bottom of the crown, about two inches long, all around the bottom of it. These will become tabs that attach to the brim. This is best illustrated in a picture I took of Eden making her hat:


6. Connect Brim to Crown. When you have your tabs cut, tear as many 3 inch strips of tape as you have tabs, and stick them to something closeby, like a table edge or your leg, so they'll be handy. Start by taping down one tab, then do the tab opposite, then the tabs between, and work your way around. So, do the north tab first, then the south tab, then east and west, etc. This will keep your project even. It's a good idea to try on during this process so you can gather it in or stretch it out a bit, as needed. Tape all your tabs down firmly. If at any point the hat becomes too big, create a gather and tape it down. If it is too small, cut the crown apart, add more tape, tape it back together, and you will *never know* there was a problem. Duct tape is awesome!
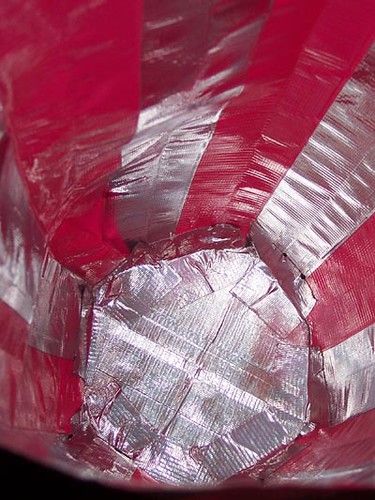


7. Attach the Top. The only thing left is to make the very top of the hat. If you still have the piece you cut out of the brim, you can use that to finish the top, or you can create a new piece using the same strip-on-strip method, and cut it into a circle. It's not necessary to make it perfect at first cut, you can trim it to fit later, after you tape it in. Attach it with tape strips inside the crown where it won't show:


8. Embellish. Now you can trim the brim into whatever shape you like. Zig-zag, circle, scallops, or whatever. You can cut out embellishments and tape them on, add a hat band, flowers, whatever you like. We added stars on this hat to turn it from this:


To this:


Eden rolled her brim to create a cowboy-hat-like effect:


That's it! There are more pictures in my Flickr Set but I can't resist posting a few more here. Any questions, please email me. If you do this project, I would love to see the results! Stay tuned for more Vote for Me materials, and happy campaigning!
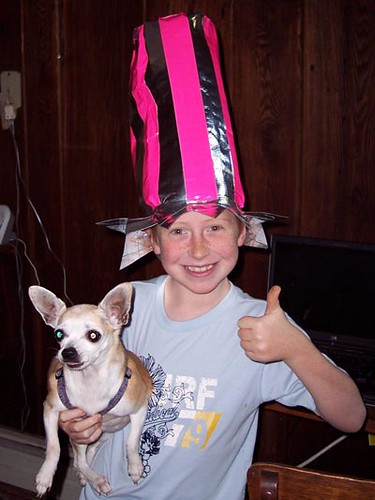
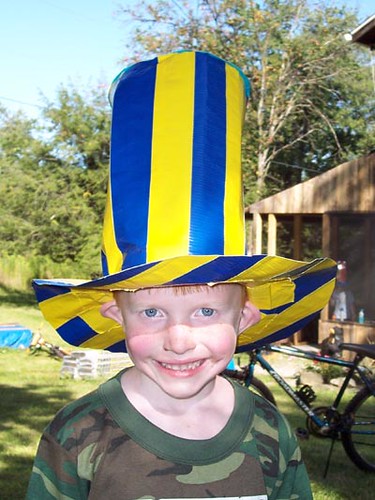
Benny's hat:


Jordan's hat:


Cameron's hat:


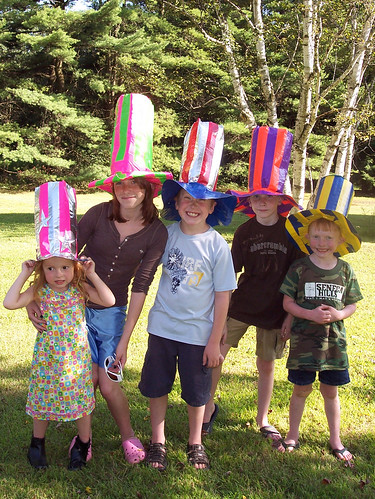
Happy Homeschoolers:


Is this your first time at Little Blue School? Welcome to the blog! I hope you'll stick around and visit some of my other posts for more homeschooling ideas, projects, songs, and crafts. If you found this page helpful, would you bookmark it on your favorite social bookmarking site? Thanks!

Sock Monkey Pants

Hi! I warned you about sock monkey pants, did I not?


I will blog the elections class materials this afternoon. We are doing the "Funny Hats at the Convention" project today with some other kids that are coming over, and I want to include pictures and whatever variations we come up with. So that lesson will be available tonight.

For now: SOCK MONKEY PANTS!

Wednesday, July 30, 2008

Hidden Poetry Project

One challenge in teaching very small children to write poetry is that they don't really know what it looks like -- its literal or even imaginary shape. Children hear stories of a certain length and "shape" regularly. There are reliable forms and predictable elements that a child can make their own. Once upon a time, there was a princess. Once upon a time there was a lonely shepherd. In the end, the monster was defeated and the princess married the prince. From that jumping off place, a child can bring in the talking potatoes or the underwater bicycle or whatever they bring to the form, because they mostly know what to expect, and what is expected of them.

Poetry is different, because its forms are so varied. There are traditional pieces that look very organized and rhyme and maybe fit on a page in a sonnety way. There are more freeform pieces with different line lengths and interesting breaks and punctuation. A child encouraged to write a poem may not immediately know the scope -- two lines, twenty lines, twenty pages? This project was a way that my kindergardener could visualize her poem and get a sense of the space she was going to fill, before she wrote it.

I found this cool painting technique on Scrumdilly-Do and decided to modify it into a poetry prompt for teaching the junior class in Phi Bensa Zoe Academy. Phillip is five, Sadie is four, and they both did really well with this.

If you click on this link for the painting idea, you'll see very excellent how-to pictures, much much better than mine. The basic idea is that you fold up a big piece of paper in a staggered accordion fold. You just put little ripples in it so that when it all lies flat there is a new surface for the paper , with lots of hidden little strips folded up into it. Then you paint on this new surface:


Then you let it dry for a while and stretch it out:


This is where the poetry comes in. After the kids had these neat staggered strips of color and these white strips in between, I had them dictate a poem to me, and I wrote each line in a white strip. Very cool. They could see how many lines they needed and about how long the lines would be, so I think it looked somehow doable for them. Anyway, they did it:


Here's Sadie with her finished project. It is a poem about ballet and karate and I think the theme of it is that she really likes to leap around the house yelling and making muscles at us but that doesn't mean she can't still call herself a ballerina.


The coolest thing about this is that you can fold the paper back up, hiding the poetry, and it becomes a painting again. It's a secret poem. Possibly a magic poem. The magical properties have not yet been tested yet. If I wake up and the sink is empty of dirty dishes, I will let you know. It certainly was cool to put it back together, and unfold it, and fold it up again, etc.

Many skills involved here: folding, paper-clipping, painting in one direction (you want to paint in strokes perpendicular to the folds so you don't get any into the white strips) Sadie enjoyed herself, and so did Phillip. So, good for kindergarten. But would this exercise have value beyond the paste-craving years? An older child, or even an adult, might find this an interesting way to integrate writing and art. The pre-defined line limit could be seen as a constraint or a challenge -- kind of like making yourself write a sestina or even a haiku. Give it a try and see what you come up with. And props to Scrumdilly-do again.

We're part of the Book Arts Bash. Are you?

Monday, July 14, 2008

An Approximation of Old Jerusalem

Those of you who know me will remember that in early June I went through a short period of hair-pulling insanity and mouth-foaming angst as Ahno and I were constructing the decorations for old Jerusalem at church. Ms. Charlie's summer program for the children involves learning about the culture and custom in Jerusalem in Jesus' time. They are learning to say Hebrew words, recognize objects in the home, and practices in the synagogue. They're going to make bricks, dye fabric -- yesterday they worked on using a stylus to create Hebrew words in a block of wax.

Ahno and I are not responsible for the awesome lessons, but we did make the backdrop for it, and here's our work:

The "in the home" set with Ms. Barbara teaching the children:


The "in the synagogue" set:


More synagogue:


Two homes, or a home and a market stall, or two market stalls, depending:


Onlookers:


Ahno and I worked together, but she did all the conceptualizing, drawing, etc. I did the lifting and carrying the backdrops up from the basement and around the room. :) I did the backdrops in the homes/market stalls and she did the sheep and donkey and the angel in the synagogue -- the picture of the donkey was blurry but he is a very fine specimen. Anyway, whatever it is, it's done, which is more that can be said for the dishes.

Tuesday, August 28, 2007

Make a Silver Seashell Frame: A Preschool Craft with Shells from the Beach

Last week at Phi Bensa Zoe Academy, our homeschool mini-co-op, the junior class did a math/art/nature project that resulted in a picture frame decorated in painted shells. Of course, with preschoolers, it's all about the process.

Step 1: Wash the shells.

I had a big bucket of shells that were pretty much straight from the beach. Sand in them, bits of seaweed, random ocean gunk, etc. I put the bucket in the sink and turned on the water. Sadie and Phillip washed the shells and each chose a bowl full to use in their projects.


This was definitely the kids' favorite part of the whole thing. They liked clinking their hands around in the bucket of shells and water, they liked picking out different variations of color and shape, and we talked about the creatures that had inhabited the shells, why they were shaped how they were shaped, why they were sandy, why some had ridges and some didn't, etc. The nature lesson was good, but I think the tactile sensation was better.

Step 2: Paint the shells.

When they had their shells picked out, I laid paper towels on the table and set their bowls next to their workspace. They each chose ten shells, which we laid out in a row and numbered, then ten more, another row, then ten more. We counted to thirty, we counted by ten to thirty, we talked about three groups of ten making thirty, and we exploited the math moment in other ways. Then we painted.


Painting shells is complicated because of the ridges. We tried, with varying degrees of success, to paint with the ridges rather than across them, to make an even, smooth layer of paint. We also tried to cover the whole shell.


We used pearl white and metallic gold paint, and then came behind with silver and gold glitter paint. I like glitter paint 50 times better than shaking loose glitter onto glue. It's so much easier to control, so much less messy, and so much less likely to get into your eye and drive you crazy for the rest of the day.

Step 3. Arrange the Shells on the Frame.

After the kids chose their favorites and organized them on the frame, I came behind with a glue gun and attached the shells. We used an unfinished wooden frame, which we later varnished with spray varnish, because the glue and the shells will stick better to an unpainted wood surface than to paint or shellac.


Another example of the quiet, private nature of homeschool learning. Looking at the finished frame, some silvery shells stuck onto a wooden rectangle, you don't see the math, the marine biology, the joy in the tactile sensation. While school teachers have to focus on deliverables, proofs, and evidence, the homeschool teacher has her own experience, her own memory, her own relationship with the project and the moment, and there's no one to prove it to, no need to quantify it.

Of course the homeschool teacher also has her homeschool blog where she occasionally does record it, quantify it, and provide all the evidence she likes.